When you set out to create spaces intended for bike parking, the key outcome should be an area that allows cyclists to easily park their bikes with a reasonable expectation of security and protection for the short term.
This typically means less than two hours, on average.
If your goal is to provide more secure parking for longer periods of time, that would be considered bike storage, which has its own distinct factors and decisions that will need to be considered.
For creating secure and convenient short-term bike parking areas, use the bike parking design guidelines outlined on this page.
The information found in this guide will help you more easily plan, layout, and create effective spaces.
Without designated and organized bike parking, it is easy for problems to arise.
This is true even in areas where only a few cyclists are present. And as the population becomes denser, these problems increase.
The lack of quality options for parking bicycles will lead to problems of clutter and damage. This can commonly be seen on trees, street signs, site furnishings, and other amenities.
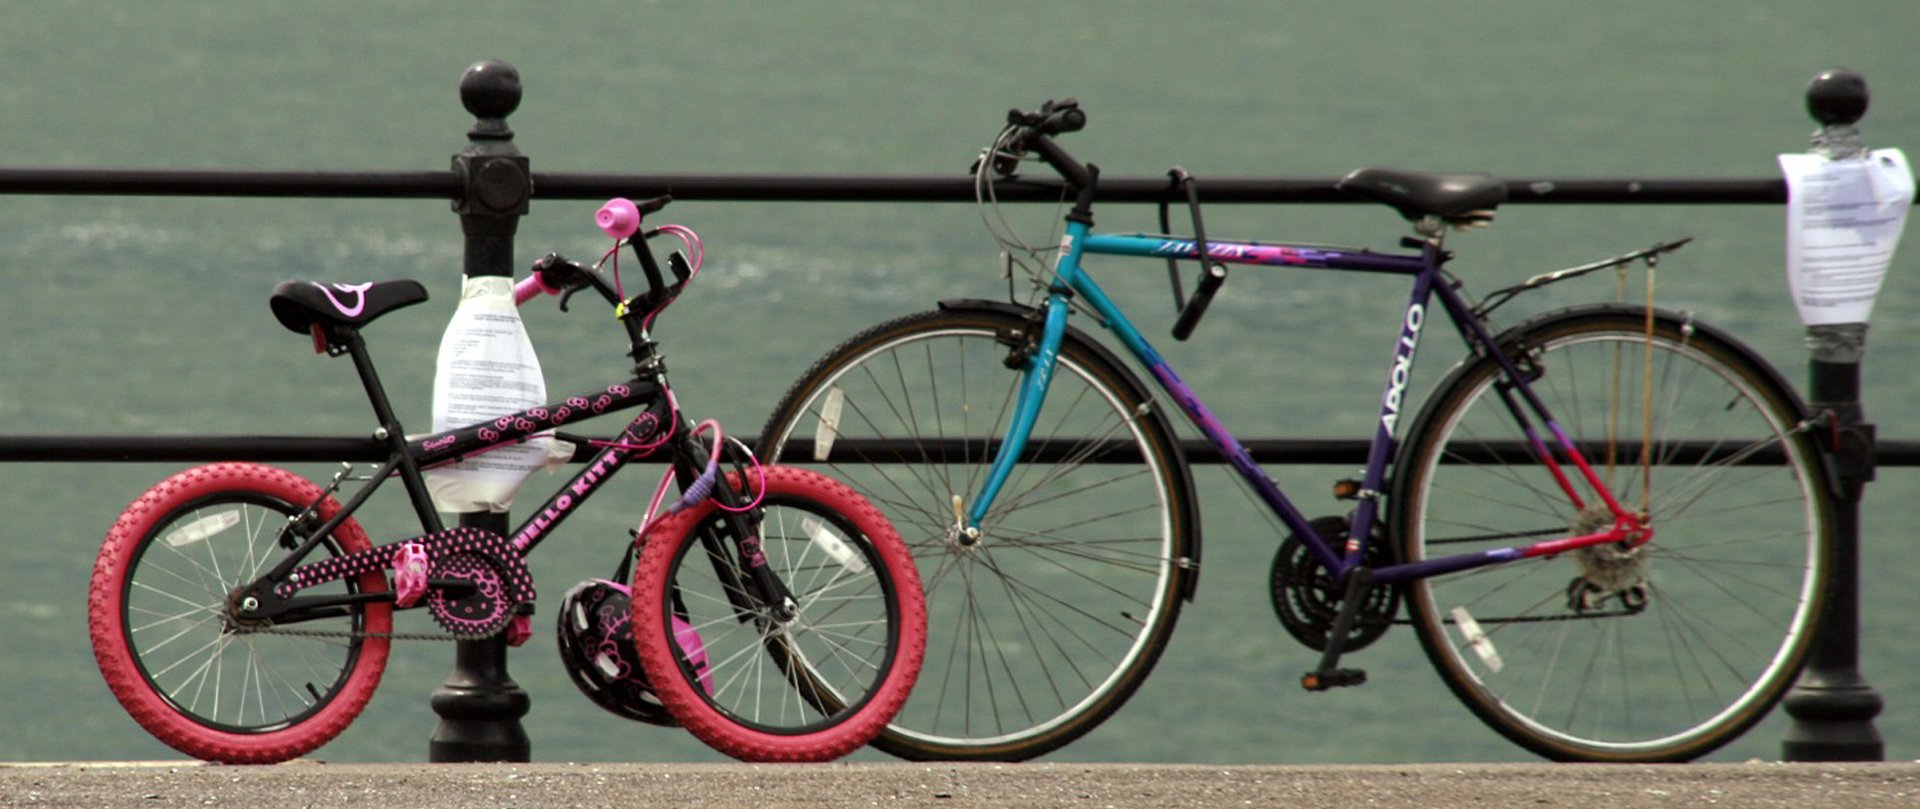
Without adequate bike parking, cyclists will lock their bikes to anything seemingly secure: fences, street signs trees, railings, site furniture, and more.
This is because a cyclist will choose the “best option” available to secure their bike, which usually ends up being one of these items.
Ultimately, the presence of secure and accessible bike parking will be the most important placemaking factor that influences the destination of a cyclist.
Simply because this is what offers the best solution for parking the bicycle for the short term.
And adding biker-friendly amenities would benefit most any destination.
- Multifamily residential buildings
- Schools/University campuses
- Commercial businesses
- Business offices
- Parks, sidewalks and other municipal amenities
- Public transit stations, pick-ups/drop-offs
- Hospitals
- Car parking lots and garages
- Other public spaces intended for usage by the community
Bike Parking Design Guidelines
When planning a bike parking area, your focus should remain on convenience for the cyclist and the utility of providing the greatest security for the bike.
Convenience
Convenience can be achieved by placing bike racks in a location that is easily accessible. To do this, the closest rack should be installed no more than 50 feet from the primary entrance of the building or intended destination.
If your area is placed a greater distance away or in out-of-the-way locations, cyclists may opt to use closer alternatives like street furniture, trees, or fencing instead.
Design Tip: Make sure to place bike parking within 50 feet of the main entrance.
The bike parking area should also be closer to the entryway than the nearest car parking stall. This makes it more desirable than car parking to encourage cycling.
You’ll also want to consider paths that cyclists are most likely to travel in approaching your bicycle parking space. The area should be near these paths of travel and easily accessible.
If it is too far off bicycle travel paths, the usage will be significantly reduced.
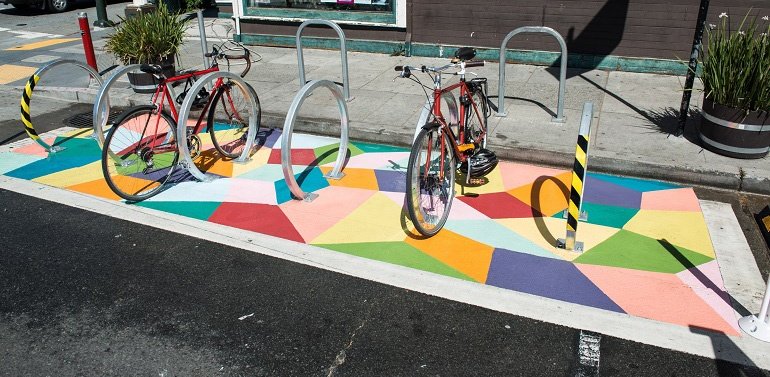
Increasing the visibility of the bike parking space also helps the cyclist easily locate bike parking as they approach the destination. This can be done with signage or by making the rack itself as visible as possible with bright colors.

Signs, delineators, and markings on the ground are ways to help cyclists easily locate and access bike parking areas.
Adding paint on the ground to indicate and mark the designated area for bike parking can also increase the convenience factor.
Bicycle Security
The primary factor that makes your bike parking area secure is the installation of bike parking racks.
Placing bicycle parking in an area near pedestrian traffic will add an additional element of security. The traffic acts as passive surveillance and a deterrent to potential theft.
When bike parking is set behind buildings, in alleyways, or other out-of-sight locations, it gives thieves more opportunity to beat the security of the lock, rack, or installation and steal the bicycle.
The bike parking should also be visible from the intended destination. This lets cyclists keep an eye on their bike and be more confident about the security. This also provides another level of passive surveillance from other people at the destination.
Determining Number of Bike Parking Spots
Many cities, towns, or other governmental organizations have set minimum ordinances or other mandates. These are the best places to determine the number of bike parking spaces needed.
Library.municode.com is a great resource to begin your search.
You can usually find bike parking guidelines and ordinances related to capacity, placement, and right-of-way in a city’s public works or parks and recreation department.
Another great resource for guidelines and ordinances is bicycle advocacy organizations.
These are communities of cyclists who live the bike lifestyle and have years of resourceful insights when it comes to bike parking. They usually have at the ready or can easily direct you to local resources.
The Association of Pedestrian and Bicycle Professionals (APBP) also provides recommendations for minimum parking requirements in their Bicycle Parking Guidelines resource:
- Hospitals/Health Care: 1 space for each 20,000 sq. ft. of floor area | Minimum 2 spaces
- Schools: 1 space for every 20 students of planned capacity | Minimum 2 spaces
- Colleges and Universities: 1 space for every 10 students of planned capacity | Minimum 2 spaces
- Business Offices: 1 space for each 20,000 sq. ft. of floor area | Minimum 2 spaces
- Off-street Parking Lots/Garages: 1 per 20 auto spaces | Minimum 6 spaces
For more urbanized or bike-active communities, plan for another .5 – 1 space per volume.
Bike Rack Installation
When installing a sidewalk bike rack, the primary mounting options are:
- In-ground Mount
- Surface Mount
- Rail Mount
- Freestanding
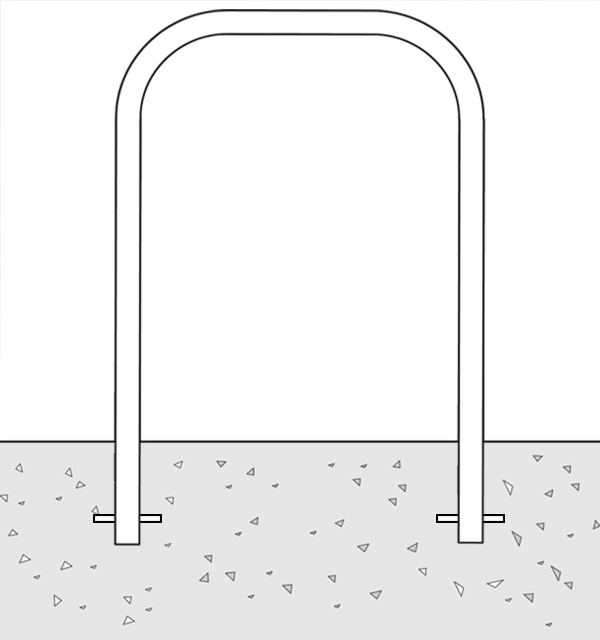
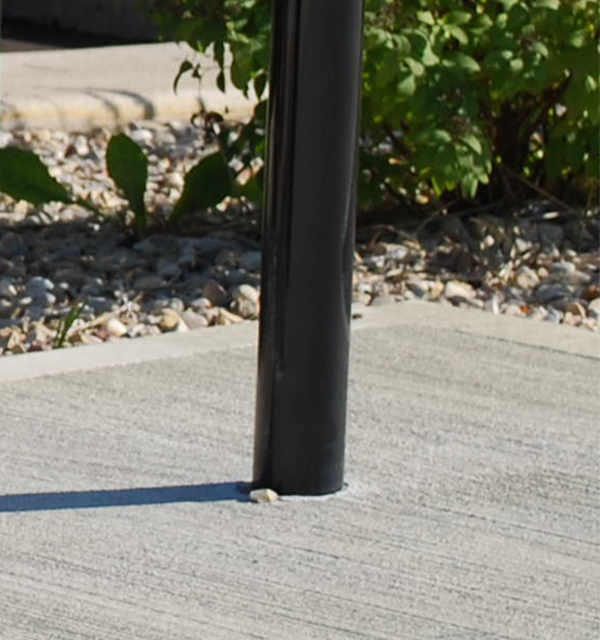
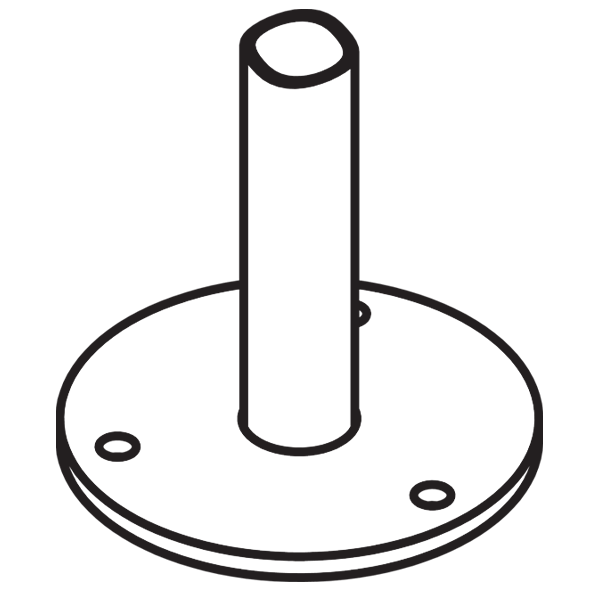
An in-ground mount is the most secure. With this mount, the rack is placed with the feet at a designated distance below the surface level. Concrete is then poured embedding and securing the legs.
A surface mount involves securing the rack to the surface with wedge anchors and metal flanges on the rack. When surface mounting, it is recommended that tamper-proof hardware be used. This will help restrict a thief’s ability to unsecure the rack from the ground.
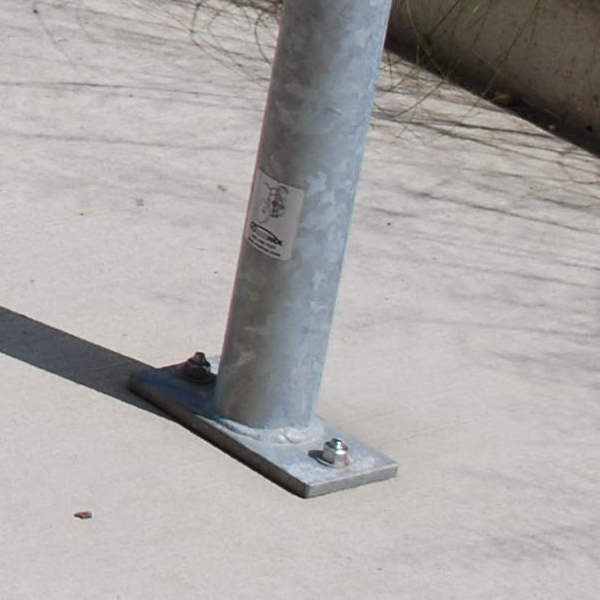
Note that the flange on the rack could be square, rectangular, or circular in shape depending on the specific rack being used.
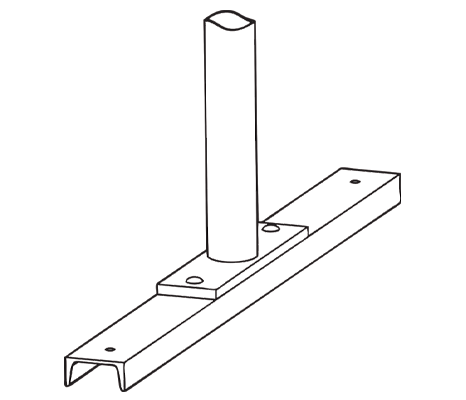
A rail mount has multiple racks bolted to rails. The rails can then be anchored to the surface or left freestanding.
Freestanding bike racks are not anchored and rest on the surface. Bike racks that have a freestanding mount should have an enclosed locking element.

Installation Mounting Surfaces
By far the best surface material for installing bike racks is going to be concrete. This is the most secure option for installing a bike rack. It is also the least expensive. In-ground and surface mounts are options with concrete.
When placing racks on an asphalt surface, there are two main options. The first is to do an in-ground mount by cutting holes in the asphalt for the legs. Then place the rack and pour concrete footings to secure the rack.
The second option would be to use racks on rails. The entire unit can be left freestanding or the rails can be anchored to the asphalt.
For pavers, they should be removed, concrete footings poured, and the rack installed in-ground. Racks on rails are also an option for this surface material.
Surface mounts should be avoided with pavers. They can be easily loosened, making it possible to remove the rack from the ground. A thief can then slide the lock off the rack and take the bicycle.
For more natural surfaces like dirt and grass, pouring concrete footings for an in-ground installation is the best decision. Freestanding racks on rails would be the next best option.
Laying out Bike Racks
How you lay out your bike parking will affect how easy it is to access and its overall use.
When racks are placed too close to objects or not spaced properly, it can reduce or eliminate the number of usable spaces.
Bike Rack Clearance and Spacing
The primary scheme of your bicycle parking design should incorporate adequate clearance between the bike rack and walls, other fixed objects and driving or parked cars.
In general, allow for the following:
- Enough end and side clearance to operate bicycles into and out of the parking area
- Adequate clearance around the rack for cyclists to access and securely lock the bicycle to the rack from the side
- Access to the rack from all sides so all available parking spaces may be used
The orientation of your bike racks in relation to these elements will also necessitate different placements.
When laying out bike racks parallel to walls or other objects, we recommend:
- Setback of 48" recommended | 36" minimum from walls and other fixed objects
- Setback of 24" from roads/parked cars
- Setback of 96" from walls to create aisles or allow walkways for pedestrians on sidewalks
- Spacing of 72" recommended | 48" minimum between multiple racks
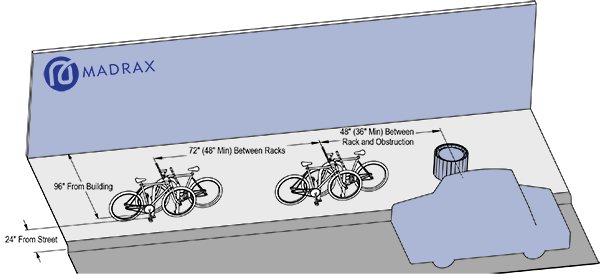
Recommended layout for parallel bike parking
When laying out bike racks perpendicular to walls or other objects, we recommend:
- Setback of 48" recommended | 36" minimum from walls and other fixed objects
- Setback of 36" recommended | 24" minimum from roads/parked cars
- Setback of 132" from walls to create aisles or allow walkways for pedestrians on sidewalks
- Spacing of 48" recommended | 36" minimum between multiple racks
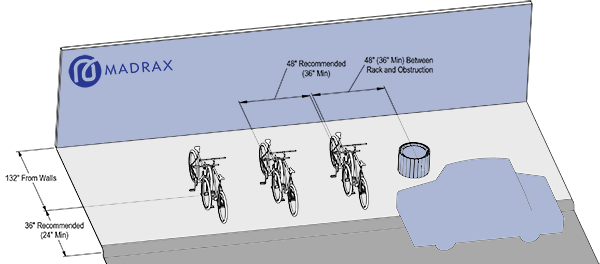
Recommended layout for perpendicular bike parking
Proper spacing between perpendicular bike racks is necessary to avoid handlebar conflicts and allow access from the side of the bike.
Use these standard bike parking dimensions to get right spacing, setback and clearnance measurements for your bike parking area.
Selecting a Bike Parking Rack
Not all bicycle racks are created equal. When selecting a bicycle rack, determine the appropriate user and where the bicycle racks will be installed. Ease of use, support of the bicycle, security, capacity, function, quality of materials, and aesthetics are all considerations when selecting bicycle racks.
The ground bike rack you select will be the most important factor in the security and ease of use of your bike parking area.
There are many racks to choose from and they differ in their security, dimensions, spacing options, capacity for parking bikes and more.
We cover the topic of selecting commercial bike racks comprehensively in another guide and is worth reviewing to ensure you are not installing bad bike racks that will go unused and draw the dissatisfaction of users.
As it relates to bike parking, there are essential elements of the bike racks you select must posses.
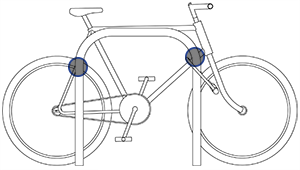
Locking the Frame and Wheel to the Bike Rack

The primary feature of a bike parking rack is that it should allow both the frame and at least one wheel to be secured to the rack using a u-style lock.
U-racks and Post and Ring bike racks are commonly used in these applications.
Grid racks and others that only hold the wheel leave bikes susceptible to theft as the frame can easily be removed from the wheel.
Supports the Bicycle in Two Places
Racks that only hold the wheel are also known to damage bicycles as the full weight of a bicycle is entirely supported by the wheel. This typically results in bent wheels.
A bike rack should generate two points of contact on the frame of the bicycle. This will provide proper support for the bicycle.
Racks that support the frame, but with only one point of contact, make it more likely the wheel of the bike will turn and cause the bike to fall. This causes damage to the bike and creates clutter on the ground.
Resists Cutting, Bending or Deformation
The bike rack should also resist cutting, bending or deformation. Many thieves will attack the rack to gain access and steal a bike.
Make sure the selected racks are thick enough to resist cutting with common hand tools that can be carried/concealed in backpacks or coats.
Securely Mounts to the Ground
The rack also needs elements that allow it to be securely installed or mounted to the ground. When a rack can be dislodged from the ground it becomes useless.
As covered earlier, the most secure method would be an in-ground installation. Racks with legs that can be encased in concrete are preferred.
Bike racks with flanges for surface mounting should be chosen to use when installing on existing concrete surfaces.
When creating parking on asphalt, pavers or natural surfaces, the preferred choice is in-ground mounted racks using poured concrete footers. The alternative solution is to select bike racks on rails.
Types of Bike Parking Racks
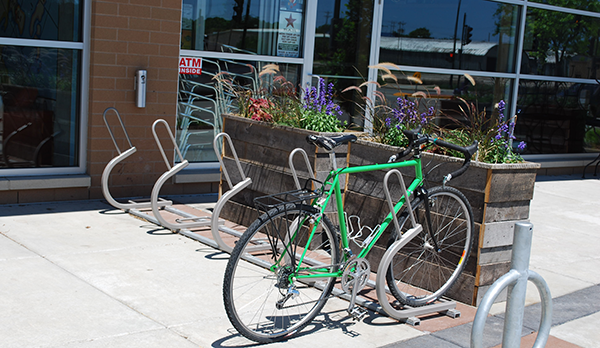
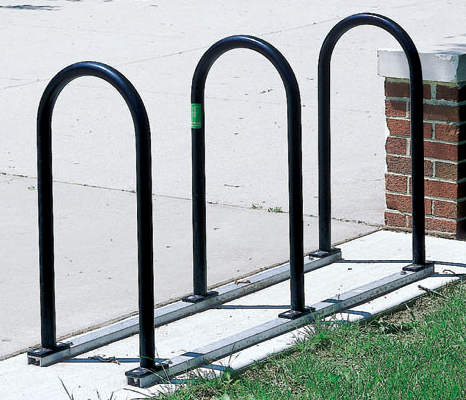
U Bike Racks
Known as U Bike Racks, Inverted U Racks, and Staple Racks, this style of bike rack may be the most simple but offers the key features desired for bike parking.
It supports the bicycle frame in two places, helping to keep it upright.

A u bike rack also allows for locking of the frame and a wheel to the rack. The rack is durable and one of the most secure. This type of rack also comes in many design styles that go beyond just a “U” shape.
Post & Ring
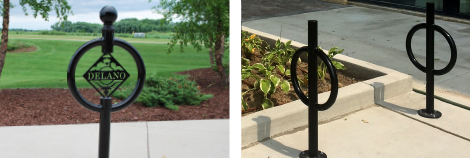
Post & Ring bike racks have a been a bike parking favorite for years. They provide good security and support for bicycles. The height of the ring needs to be kept in mind. It may be difficult to lock a frame and wheel to the ring it if it too high.
Wheel Pocket Bike Racks

Bike racks with a wheel pocket add an additional level of support that
keeps the bicycle from falling over.
The well also ensures bicycles are parked in the proper position on the rack. Racks with staggered vertical heights allow for more bikes to be parked within an area.
Putting Your Plan into Action
Biking is increasingly becoming the number one choice for alternative transportation and it is important to provide secure bicycle parking. By providing bicycle parking, you will be encouraging a healthy community and environment. But it is also becoming a necessity as more and more communities have established or are writing requirements for bike parking.
Make sure you nail the details of your project by tapping into the experience and resources of Madrax.
Contact us today and let us know how we can help guide your project over the finish line. We’ll partner with you to work towards a successful solution.
Bonus Tip: How to Park a Bicycle
Learn the 4 steps to correctly park your bike from the experts at Madrax. Take into consideration the location, the bike rack support and the lock.